It turns out that I was misinformed about the viewing angle of the ArduCam 5MP, so I’m re-creating this post with the correct updated info and some more ideas.
[table]
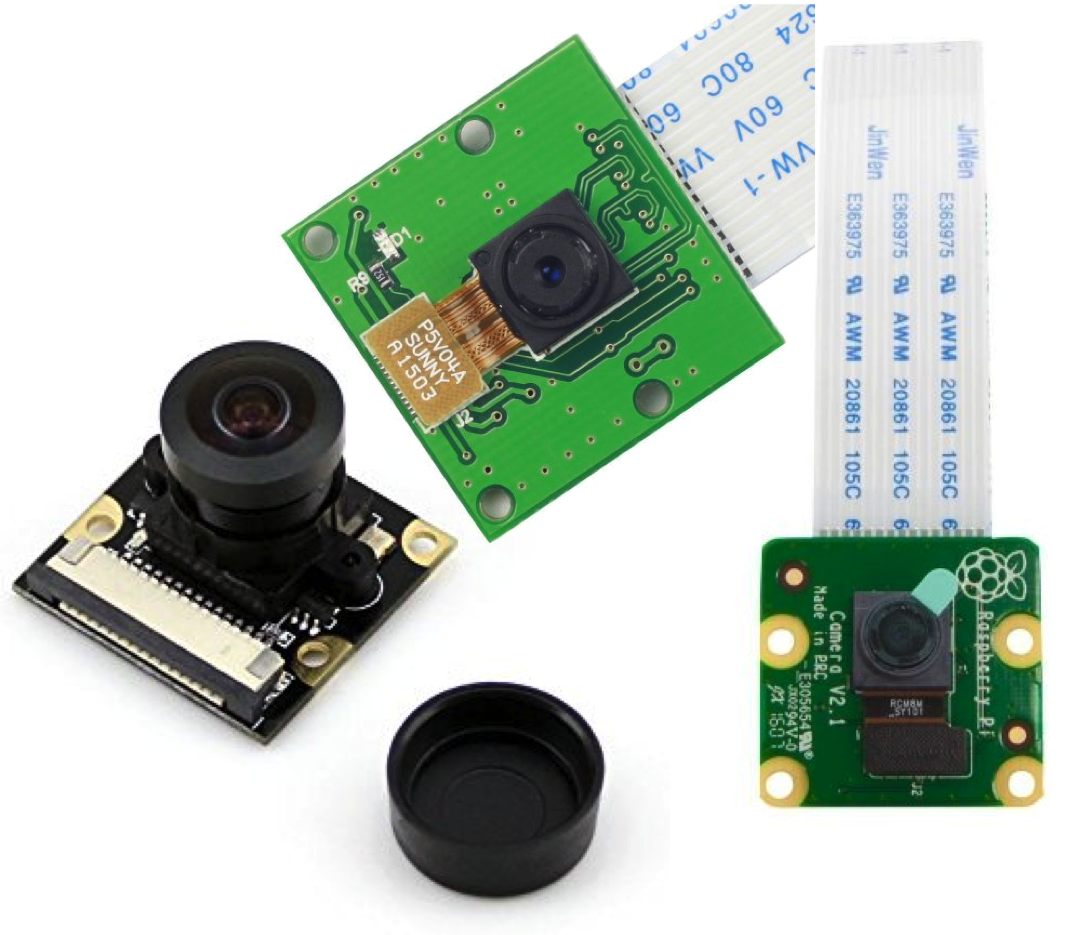
Camera,Viewing Angle,Price,Image Quality, Multiplexer Compatibility
Waveshare Fisheye,160°,$38.99,5 megapixels, Unknown
Raspberry Pi 8MP,54°,$25.39,8 megapixels, Yes – IV2
Arducam 5MP,54°,$14.99,5 megapixels, Yes – IV1 & Arudcam Multi
[/table]
Notes: The larger the viewing angle, the fewer cameras Il’ll (theoretically) need. Higher image quality and lower price are obviously preferable. To resolve the One Camera per Pi problem, the camera must be compatible with a Multiplexer.
The Waveshare fisheye camera is among the most expensive Pi cameras, and its only real benefit is it’s wide viewing angle. This camera’s unreliability/fragility and (presumed) incompatibility with a multiplexer as well as high cost make it impractical for this project.
At 8 megapixels, the Raspberry Pi 8MP camera is the highest quality Pi camera that I can find on the market. It is, however, limited in its multiplexer compatibility, and the IV2 multiplexer will cost almost $100, including shipping and tax.
The 5 megapixel Arducam is the cheapest option and the most support. The comparative cheapness of the Arducam multiplexer ($52.99) makes it a more financially appealing choice, especially as the number of cameras required increases.
Quality
I know quantitatively that the 8MP camera takes better pictures than the 5MP. And while I know, quantitatively, exactly how much better the pictures will be, I don’t qualitatively how much of a difference those 3 megapixels will make. Basic testing of the 5MP camera revealed its good quality. While probably sufficient, the end result would definitely look nicer with the 8MP camera.
Number of Cameras Needed
This brings me to my next concern – how many cameras and Pis will be required? In order to make videos without any gaps/holes, I’ll need to cover 360° (+Z) and at least 180° (+Y). The 5MP Arducam has a approximate viewing angle of 54°. 360/54 is 6.667, so I’ll need seven of these cameras to cover the Z rotation. I’m hoping that the ~4° overlap per camera will be sufficient for seamless stitching, although more testing will be required to know for sure.
I can’t cover 180° with just 3 cameras (54°*3=162°), but I can easily cover it with four. Four cameras gives me a combined theoretical viewing angle of approximately 216°, providing a symmetrical 18° below the horizon. It will be difficult to know how this partial sphere looks before I take any pictures/videos. Two of these four cameras are already accounted for in the Z axis. 9 cameras is a lot of cameras – at 4 cameras per multiplexer (and stackable multiplexers), I’d need 2 multiplexers and an additional pi for the 9th camera. I already have two Pi’s, so their prices don’t need to be accounted for. ($15/camera * 9 cameras) + ($53/multiplexer * 2) = $241. That’s actually not terrible. I was expecting the camera & Pi portion of this project to cost over $300.
As a point of comparison, let’s run the numbers for the 8MP camera:
($25/camera * 9 cameras) + ($100/multiplexer * 2) = $425. That is considerably more expensive. I’m not yet convinced that the increased quality justifies the increased cost.
As this project progresses, I’ll need to design and 3D print a mounting system to hold all the cameras and Pis. With several rounds of prototypes, I’m anticipating that could cost up to (but probably not more than) $75. Additional costs to potentially consider include longer cables for each camera ($8.33) , a bigger (micro)SD card, a portable power supply, and possibly a user interface for one or more of the Pis.
****************************************************
UPDATE 2
It just occurred to me that I’ve been thinking about the spatial aspect of this incorrectly, and as a result, have been underestimating the number of cameras need. 360° in the Z+ direction works fine. However, 180° in the Y direction is flawed, 2 dimensional thinking. This combination would result in a horizontal panorama along the horizon and a perpendicular panorama stripe running from one end of the horizon (in front) to the other (behind), omitting most of the sky. I’m putting my spatial thinking to the test and now working on some basic 3D models to help figure this out. Once I have a better sense of how this will look, I’ll update this post.